The Zerina (OpenVPN) addon for IPCop is an excellent VPN addon. One thing it does for simplicity is the keys are compiled into a pkcs12 (*.P12) file, which contains the Certificate Authority, the Certificate, and the Key for authentication. Which is great if you are wanting to drop it directly into OpenVPN GUI for Windows. Its an easy setup. However, I’ve been working on making my switch to Ubuntu Linux and the only way to use the P12 files is at the command line. I needed an easier way to connect to the VPN’s so in comes network-manager-openvpn.
apt-get install network-manager-openvpn
After you install the openvpn addon for Network Manager you can click on the Network Manager icon on your task tray and select “VPN Connections” > “Configure VPN” where you can add your VPN connection. The problem is that this does not [yet] support pkcs12 (*.P12) files. In comes openssl, You have to extract the p12 file into PEM format.
To extract the CA Certificate:
     openssl pkcs12 -in myvpn.p12 -cacerts -nokeys -out myvpnca.pem

To extract the Personal Certificate:
     openssl pkcs12 -in myvpn.p12 -clcerts -nokeys -out myvpncert.pem

To extract the Private Key:
     With a password: openssl pkcs12 -in mydccert.p12 -clcerts -nocerts -out myvpnkey.pem
     Without a password: openssl pkcs12 -in mydccert.p12 -clcerts -nocerts -nodes -out myvpnkey.pem
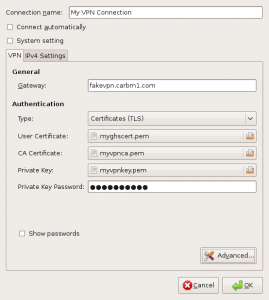
At this point we now have the three files required to setup our VPN connection in Network Manager. (see screenshot below)
Click on Add.
Select OpenVPN as the connection type and click Create.
Give you connection a name.
The gateway is the FQDN or IP address of your OpenVPN server.
Type is Certificates (TLS)
The user certficate is the myvpncert.pem file from earlier
The CA Certificate is the myvpnca.pem file from earlier
The Private Key is the myvpnkey.pem file from earlier, you may have to type in your password if you chose to have one.
OK.
I did not have to change any other settings for this to be able to work. Enjoy!


Thanks for this excellent article Craig. Like you I an an ex windows user using Ubuntu and have used the IPCop generated .pkcs and .ovpn config files from the command prompt with no problem for ages. Like you though I’m really keen to integrate openvpn in Network-Manager.
Followed your procedure but no joy. my slight confusion is in the last extraction command. You appear to refer to a different pkcs (mydccert.p12 as opposed to myvpn.p12 in the first two extractions) Is this a different p12? If so which one is that? In openvpn in IPcop I have root and host certs. that I could download, is it one of them? I do use a password and the client packages are all “Type: Host (certificate)” When I do download my Ipcop host cert it saves as a pem, so I’m not convinced this is the answer to the question I’ve put to you, as you clearly refer to a .p12 in the extraction for the Private Key.
here’s my command line as I run through the routine: I seem to have to type the .p12 password all through??
markp@markp-study-home:~/vpn$ openssl pkcs12 -in mp2.p12 -cacerts -nokeys -out mp2ca.pem
Enter Import Password:
MAC verified OK
markp@markp-study-home:~/vpn$ openssl pkcs12 -in mp2.p12 -clcerts -nokeys -out myvpncert.pem
Enter Import Password:
MAC verified OK
markp@markp-study-home:~/vpn$ openssl pkcs12 -in mp2.p12 -clcerts -nocerts -out mp2key.pem
Enter Import Password:
MAC verified OK
Enter PEM pass phrase:
Verifying – Enter PEM pass phrase:
markp@markp-study-home:~/vpn$
Any comment much appreciated. (Love the Perens quote btw!)
The last command is optional if you have your PCK12 file password protected or not. There are two commands, one for if you have a password and one if you don’t. If you don’t have to type a password when you connect your VPN then you need to use the second command: openssl pkcs12 -in mydccert.p12 -clcerts -nocerts -nodes -out myvpnkey.pem
Let me know.
Thanks Craig for your reply AND it’s now working! Not really sure if I did anything different this time? I did note that there are two commands in the last extraction, one for if you have a password (I do) and one for no password. I did use a differet pkcs this time though, so need to re-visit the first one I failed with.
In case it helps anyone else note that I had to turn on the LZO compression option which my IPCop server does use. Before that I could make a connection OK, but it wouldn’t ping.
Also worth noting that when setting up a new vpn connection in Network Manager you can use the Ipcop Zerina created conf file (*.ovpn) to import many of the settings (url, compression options, encryption type etc). You still need to manually extract the pem’s from the pkcs, but it’s a good starter for 10 and ensures you get those settings all correct. Looking forward to Network Manager using pkcs directly in the future. Thanks for your help!
I’ve been looking for this how to for a while now. Thank you!
You sir are a saint! Thank you for a simple explanation of something I look for routinely. Your site is bookmarked. Much appreciated.